Cabo LTL Customer Preferences
Cabo offers a wide range of customizable, customer-specific settings designed to enhance accuracy, streamline operations, and optimize margins. Customer preferences are organized across multiple sections of the platform, including the Profile, LTL, and Truckload tabs, allowing for tailored setup based on individual customer requirements. This article covers customer preferences under the LTL tab.
Navigation: Customer > LTL > Preferences
Customer preferences for LTL shipments can be set for each stage of the shipment lifecycle. Some of the most commonly adjusted preferences include the following:
- Quote Preferences
- Shipment Preferences
- Communication Preferences
- Billing Preferences
- Reference Code Preferences
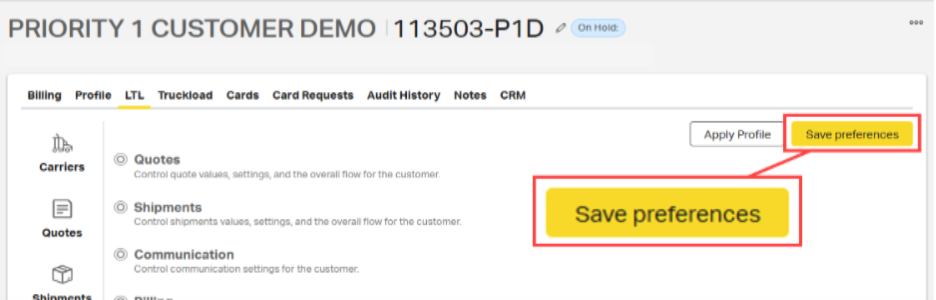
⚠️Important Note: After making changes to customer preferences, always select Save Preferences before leaving the page.

Quote Preferences
Navigation: Customer > LTL > Preferences > Quotes
Default Dimensions for LTL Shipments
Use Default Dimensions for LTL customers whose handling units consistently have the same sizing.
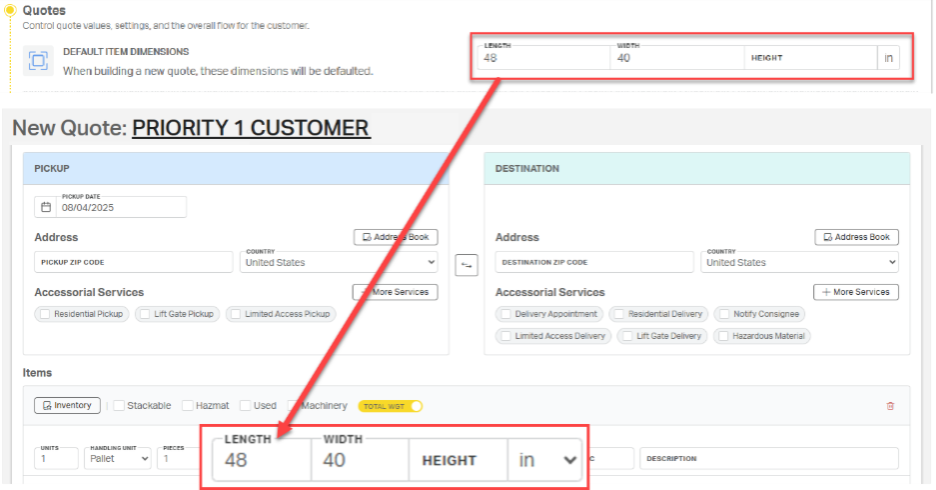
Set defaults for length, width, and/or height. All fields are optional.
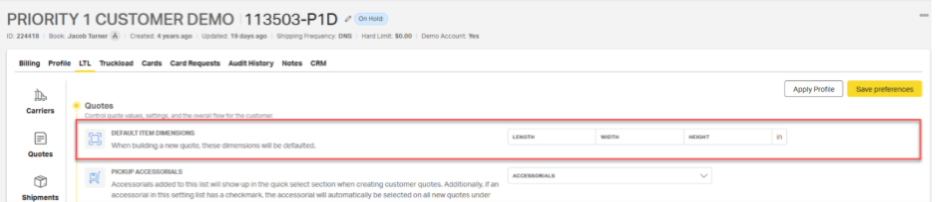
Saved values will automatically prefill in the item details section of the LTL quote form. In the example graphic below, the saved dimensions – 48 x 40 – automatically prefilled the appropriate section of the New Quote page
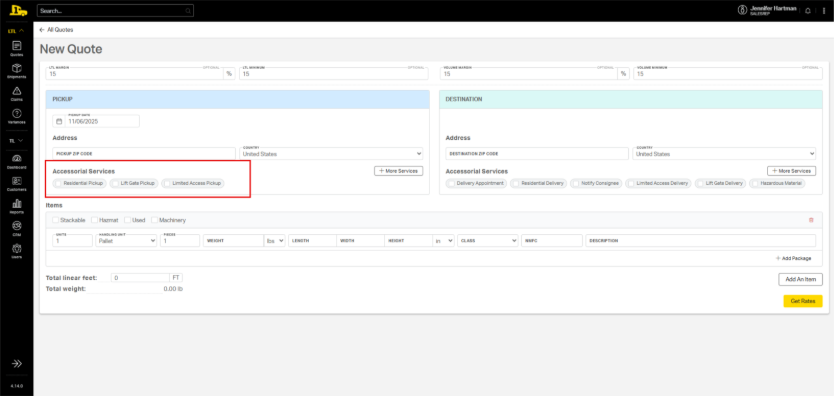
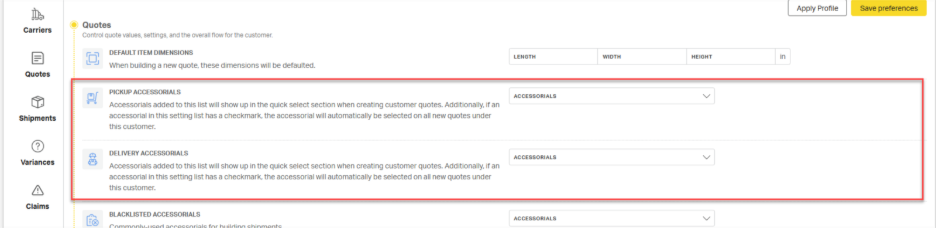
Pickup and Delivery Accessorials
Streamline quoting by customizing which accessorials appear as quick access on a new quote form and which are automatically added to new quotes by default.
- Quick Access accessorials appear on the LTL quote form for easy selection as needed.
- Default accessorials are prefilled on all new LTL quotes.
Customizing Quick Access and Default Accessorials
Navigation: Customer > LTL > Preferences > Quoting
- Locate the Pickup Accessorials or Delivery Accessorials under the Quotes option.
- Open the dropdown next to the pickup or delivery location type.
- Select the desired accessorials to display as quick access. (Once selected, the accessorial will display beneath the dropdown.)
![Apply Profile
Save preferences
Carriers
Quotes
Control quote values, settings, and the overall flow for the customer
DEFAULT ITEM DIMENSIONS
LENGTH
WIDTH
HEIGHT
in
When building a new quote, these dimensions wil be defaulted.
Quotes
PICKUP ACCESSORIALS
ACCESSORIALS
1
Accessorials added to this list will show up in the quick select section when creating customer quotes. Additionally, if an
Shipments
accessorial in this setting list has a checkmark, the accessorial will automatically be selected on all new quotes under
this customer.
Residential Pickup
DELIVERY ACCESSORIALS
7] Lift Gate Pickup
Variances
Accessorials added to this list will show up in the quick select section when creating customer quotes. Additionally, if an
accessorial in this setting list has a checkmark, the accessorial will automatically be selected on all new quotes under
2
Inside Pickup
this customer.
Construction Site Pickup
Claims
BLACKLISTED ACCESSORIALS
Z] Limited Access Pickup
Commonly-used accessorials for building shipments.
Trade Show Pickup
Notes
CAN SET FREIGHT CLASS ON QUOTE
Excessive Length, 11ft
Allow the customer to override the system-calculated freight class.
Excessive Length, 13ft
Preferences
VOLUME
Excessive Length, 15ft
Ability to quote and dispatch VLTL shipments.
CALCULATE LINEAR FEET ON QUOTE
ON](https://cdn-assets.productfruits.com/6cafbdb7-9bb9-4aa1-9841-95eb7a6e7eae)
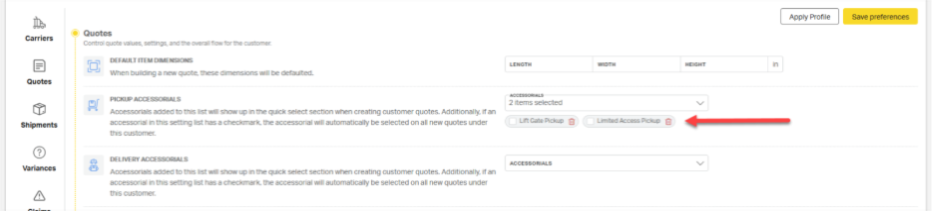
To set a default accessorial, check the box next to the accessorial. Defaulted accessorials will be highlighted yellow.
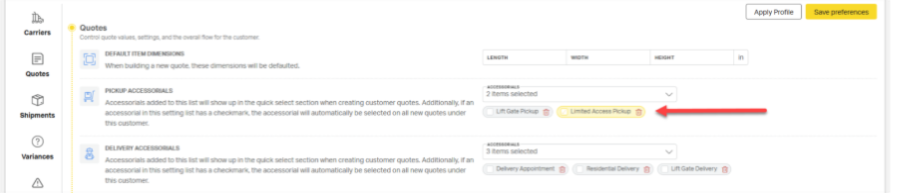
To remove an accessorial from quick access options on the quote form, select its corresponding delete icon (🗑️).
Volume Toggle
To prevent volume rates from being returned during quoting, toggle the Volume setting to OFF.
Note: When Volume is disabled, Cabo will no longer provide carrier volume rates if a shipment exceeds linear foot or cubic capacity limits.

Flat Rate
Use Flat Rate to add a custom fee to all shipments for this customer. Each listed rate will appear on invoices as a line item with the associated description.
To use this feature, toggle Flat Rate to on.

Select Add Flat Rate

Enter the charge amount along with an appropriate description.
⚠️Remember, this description will be visible to the customer on the invoice.

To add additional fees, select Add Flat Rate again.

To remove a fee, click the delete icon (🗑️) to the right of the corresponding line item.

Shipment Preferences
Navigation: Customer > LTL > Preferences > Shipment
Default Insurance Amount
For customers who ship similar freight and purchase the same insurance amount on every shipment, users can set a Default Insurance Amount in the customer’s account settings. When enabled, this amount is automatically charged on all shipments that include third-party insurance.
To configure this option, navigate to Customer Account > LTL > Preferences > Shipments.

⚠️Important: If a default insurance amount is set, it will be charged on every shipment—even if the shipment requires a higher insurance amount. If the Default Insurance Amount does not cover the full purchase price of the shipment’s insurance, the rep is responsible for paying the difference.
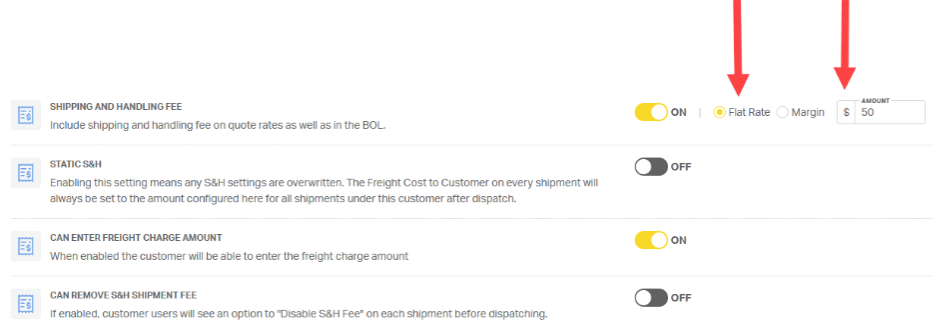
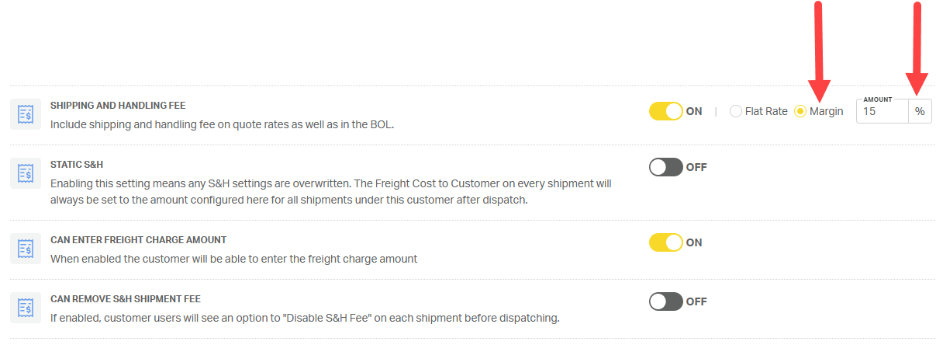
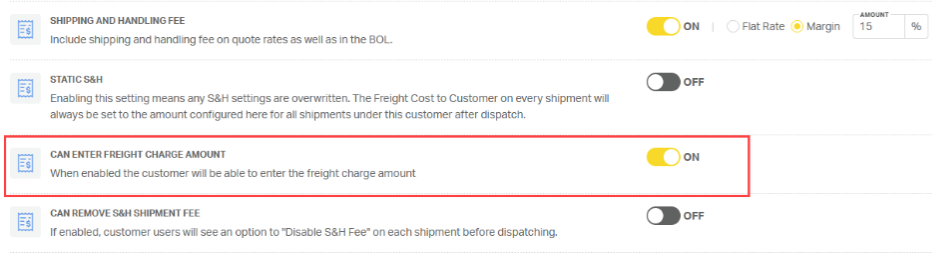
Shipping and Handling Fee
Cabo's Shipping & Handling Fee allows customers to edit and track the margin or “uplift” they add to their own freight costs.
Enabling Shipping and Handling
Navigation: Customer > LTL > Preferences > Shipments
Toggle Shipping and Handling Fee to ON, then select the fee type:
- Flat Rate ($) for a fixed dollar amount per shipment
- Margin (%) for a percentage-based uplift
Enter the appropriate value in the corresponding field.
When the shipping and handling fee is enabled, a widget appears on the customer’s Cabo dashboard displaying the total revenue generated from the shipping and handling fees customers have added to their own freight costs.
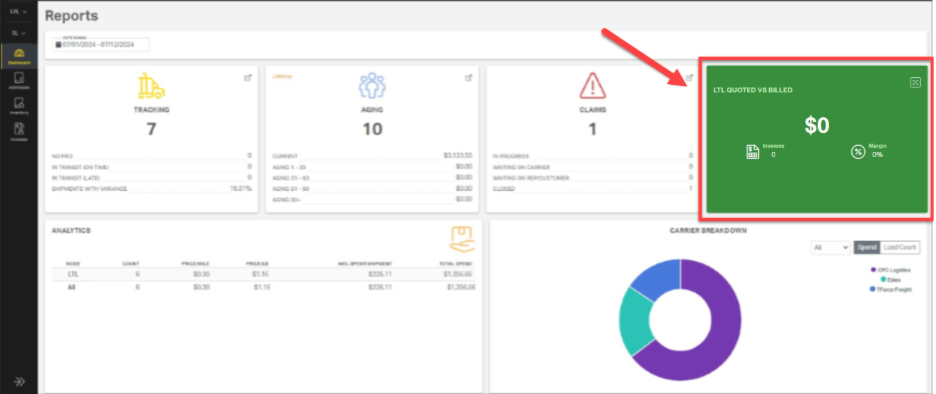
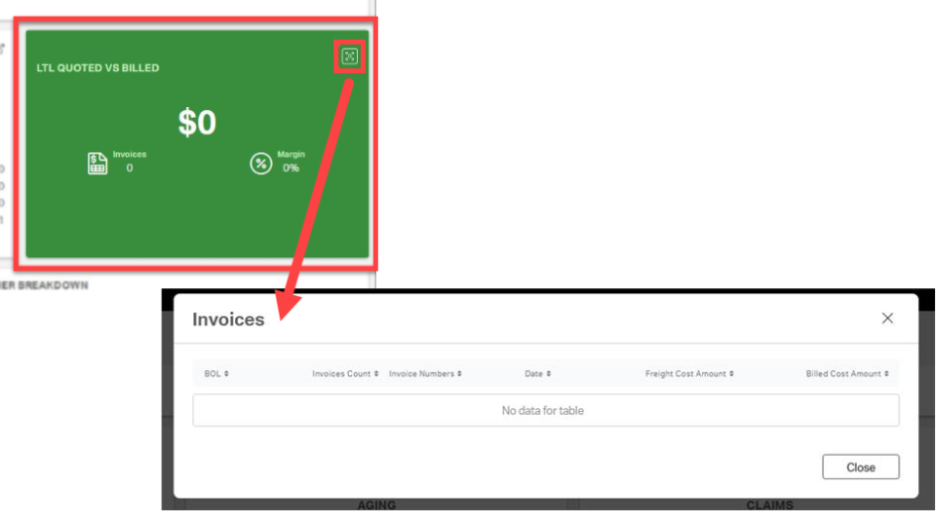
The icon in the top right corner of the Shipping and Handling Widget expands to show a list of invoices.
Static Shipping & Handling
Use Static S&H to establish a fixed price for the customer’s customer. When enabled, the system automatically adjusts the S&H amount to bring the customer’s customer rate to the total noted in the amount field.
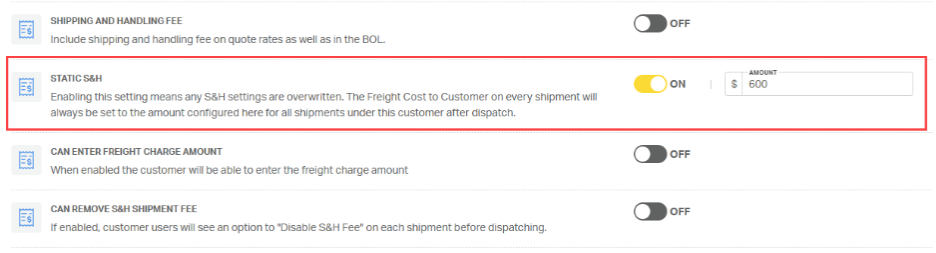
For example:
- If the static total is $600 and the rate to Priority1’s customer is $400,
- Cabo will set S&H to $200.
- $400 P1 customer rate + $200 S&H = $600 rate to the customer’s customer.
- If the static total is $600 and the rate to Priority1’s customer is $500,
- Cabo will set S&H to $100.
- $500 P1 customer rate + $100 S&H = $600 rate to the customer’s customer.
The sum of Customer Cost and S&H will always equal the Static S&H total set in Cabo.
⚠️Static S&H will override any other shipping and handling settings.
Can Enter Freight Charge Amount
To allow the customer to override the amount they charge their own customer, toggle Can Enter Freight Charge Amount to ON.
This setting does not affect the rate Priority1 provides to our customer. Instead, it
- reflects the amount our customer charges their own customer, and
- impacts the revenue earned by Priority1’s customer, which is shown in the Shipping & Handling Fee dashboard widget.
Disabling the S&H Shipment Fee
When enabled, the Can Remove S&H Shipment Fee option allows the Priority1 rep and/or the Priority1 customer to disable shipping and handling for individual shipments. To enable this option, set the toggle to ON.

Once enabled, the Priority1 rep and/or the customer will have the ability to toggle the shipping and handling fee OFF on the final page of the booking process for individual shipments.


Default Special Instructions
The Special Instructions option allows users to include notes a customer wants to include on every BOL. These notes will prepopulate on the LTL booking form and will be visible to the LTL driver. Example notes might include something like “preload photos required.”
Navigation: Customer > LTL > Preferences > Shipment

Require NMFC
Booking an LTL shipment without an NMFC code can lead to costly reclassification fees. Toggle on Require NMFC to prevent a self-booking customer from booking shipments without an NMFC code.
Navigation: Customer > LTL > Preferences > Shipment

Enable Dispatch for Customer Users
By default, customers can dispatch their own shipments. In some cases, you may need to limit this access so customers can only build and save shipments.
To remove a customer’s ability to dispatch shipments without rep approval, toggle Enable Dispatch for Customer Users to OFF.
ℹ️When Enable Dispatch for Customer Users is toggled off, an email is sent to the customer’s rep when the customer attempts to dispatch a shipment, notifying the rep that a new shipment needs to be reviewed. The shipment will also be assigned Pending Approval status and will be visible on the rep’s Shipments dashboard.
Navigation: Customer > LTL > Preferences > Shipment

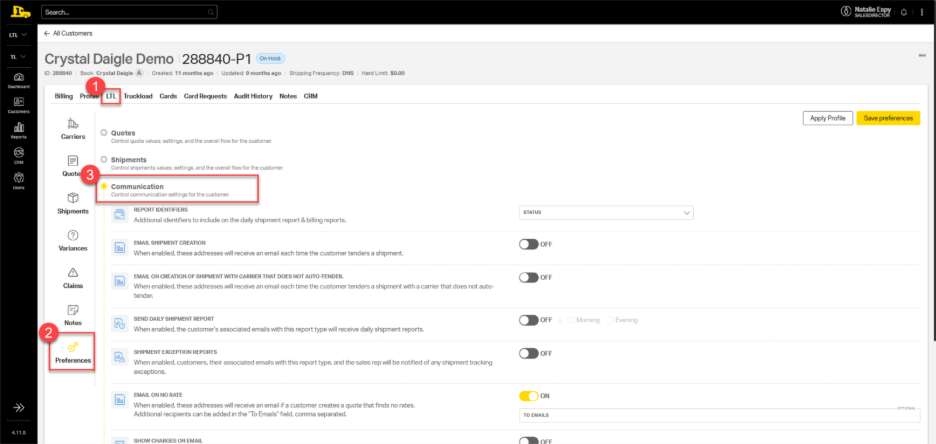
Communication Preferences
Navigation: Customer > LTL > Preferences > Communication
Email Shipment Creation
By default, Email Shipment Creation is toggled off.
Navigation: Customer > LTL > Preferences > Communication

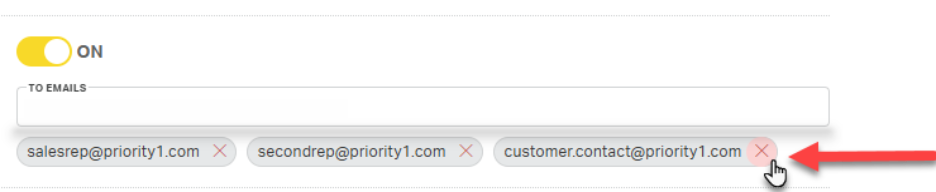
When Email Shipment Creation is active, or toggled one, all recipients listed beneath the toggle switch will receive an email each time the customer tenders a shipment. When toggled on, the primary rep on the account is automatically added as a recipient.

To add more recipients:
- Type the email address into the To Emails field.
- Press Enter.
- Repeat for each additional contact.

To remove a recipient, select the X next to the email address.
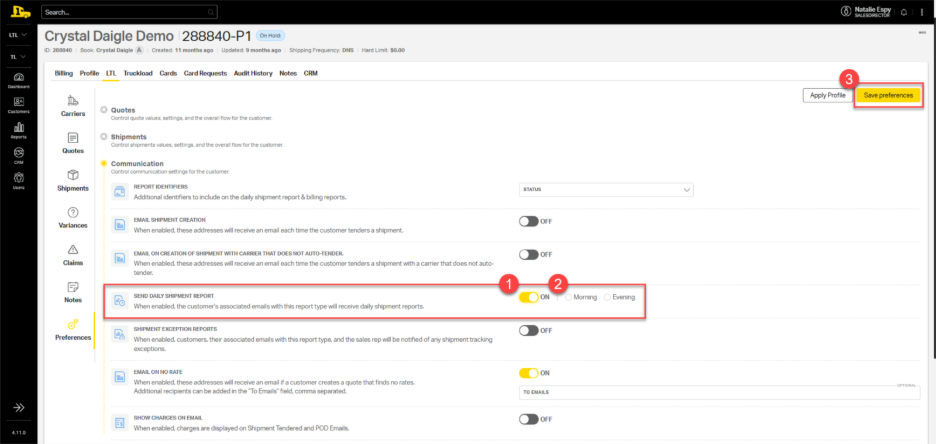
Send Daily Shipment Report
Cabo can be configured to generate a Daily Shipment Report containing the latest tracking information for all open shipments, including key details like BOL and/or PRO numbers, shipment origin and destination, and carrier information. This report is delivered as an Excel file to the customer's associated email address(es).

Setting Up the Daily Shipment Report
After navigating to the customer's account, select
- LTL
- Preferences
- Communication.
Scroll down to Send Daily Shipment Report.
- Toggle this feature ON.
- Choose the time of day for delivery
- Select Save Preferences.
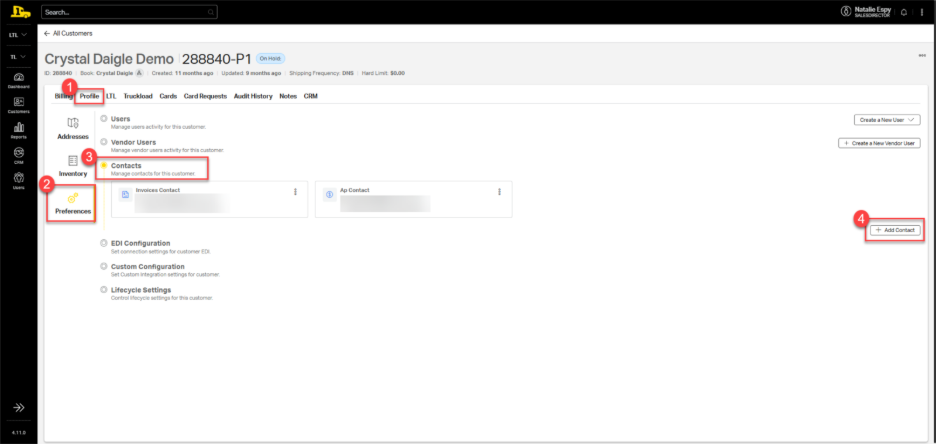
Set up a daily shipment report contact. Navigate to
- Profile
- Preferences
- Contacts
- Add Contact.
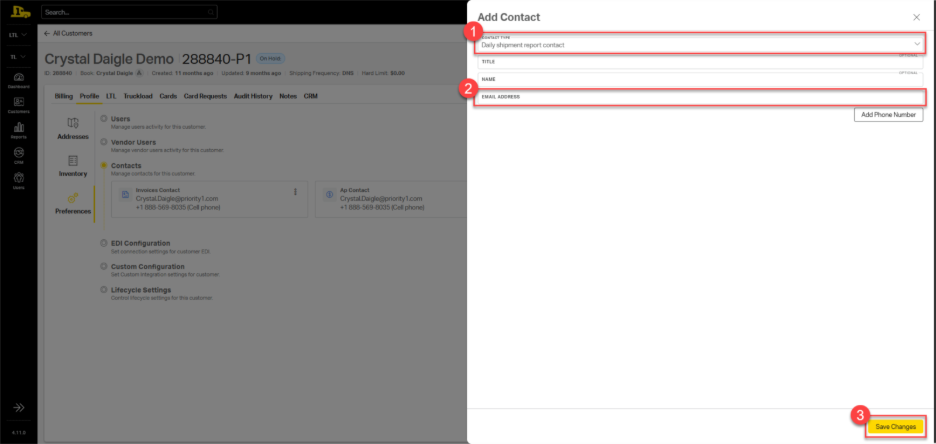
On the resulting popup window,
- select Daily shipment report contact from the Contact Type dropdown;
- enter the contact's information, including an email address;
- select Save Changes.
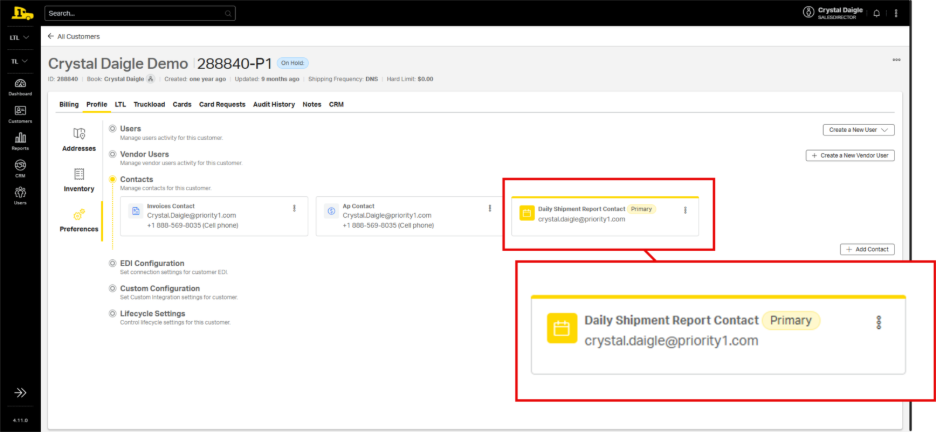
New and existing contacts will be listed under Profile > Contacts.
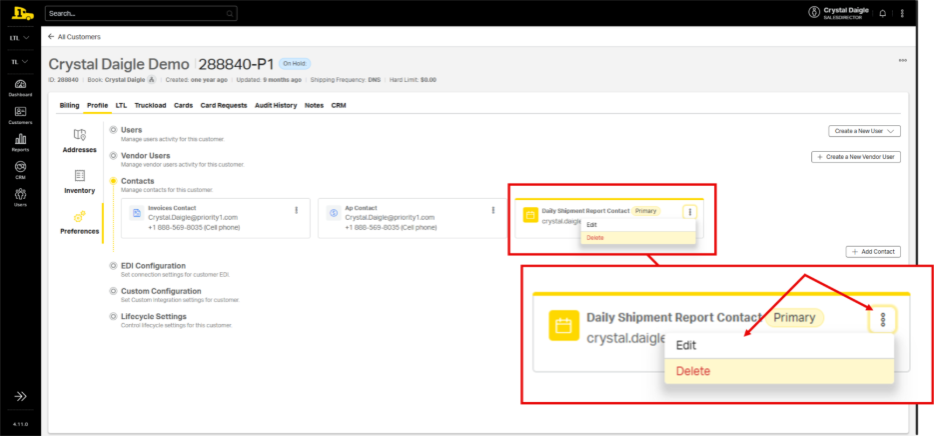
To edit or delete a contact, navigate back to the customer’s profile preferences. Click the kebab in the top right corner of the contact card; then choose Edit or Delete.
⚠️If a daily shipment report contact is not saved to the customer's account, Cabo will not generate a report. Read the full Daily Shipment Report article for more information, including how to add a new daily shipment report contact.
Billing Preferences
Navigation: Customer > LTL > Preferences > Billing
The Billing Preferences section is broken into three categories:
- Variances
- Invoices
- Rates and Insurance
Variance Preferences
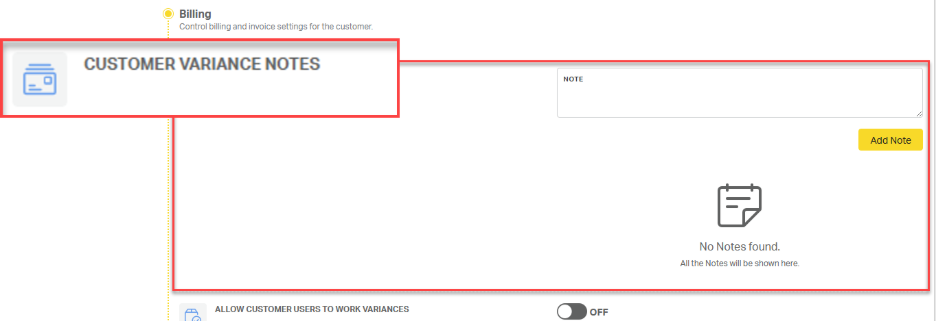
Customer Variance Notes
Customer Variance Notes are internal notes that are visible to other P1 employees. Use this field to share information on how to process and address variances for this customer.
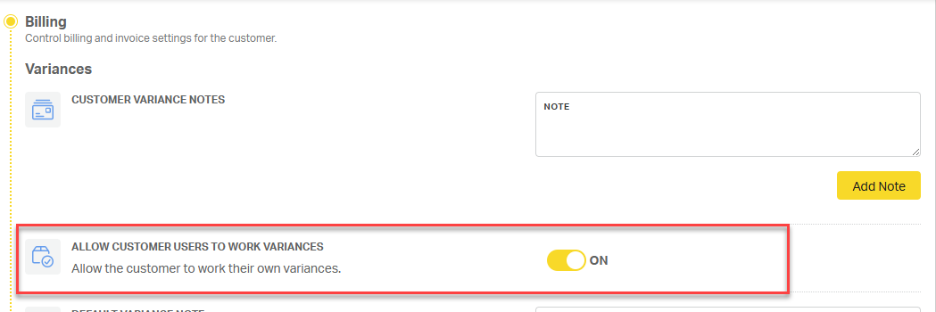
Allow Customer Users to Work Variances
To give customers visibility and control over their own variances in Cabo, toggle Allow Customer Users to Work Variances to ON.
Variance Threshold Amount
By default, discrepancies of more or less than $5 between the invoice and the original quoted amount are flagged as variances.
To update the threshold, enter a new value in the Variance Threshold Amount field. Any invoice difference at or above this amount will trigger the variance process.

Customer Variance Auto-Process Period
By default, variances auto-process after 10 days of inactivity. In some cases, adjusting this setting will better align with your customer’s internal review process.

To adjust the auto-process period, select the desired number of days from the Customer Variance Auto-Process Period.

Invoice Preferences
Navigation: Customer > LTL > Preferences > Billing > Invoices
Default LTL Invoice Memo
Use the Default LTL Invoice Memo field to include a standard note on all LTL invoices, such as information regarding carrier instructions, unloading information, or reference numbers.

Invoice Grouping
By default, invoices are sent individually via email. However, some customers prefer to receive multiple invoices grouped in a single email. You can manage this preference using the Invoice Grouping setting.

Required Documents
Use the Required Documents dropdown to attach any customer-required documents for invoicing. Users may select multiple documents.

Enable Customer Invoice Along with Receipt
For customers on prepay terms, toggle Enable Customer Invoice Along with Receipt to ON to send the customer invoice alongside the receipt.

Show Charges on Invoice
By default, customer invoices display combined charges. To show line-item charges, toggle Show Charges on Invoice to ON.

Send Invoices from Collector
By default, invoices are sent from a Priority1 no-reply email address. If a customer's firewall blocks these emails, toggle Send Invoices from Collector to ON to have the invoice sent from the assigned financial analyst’s email address instead.

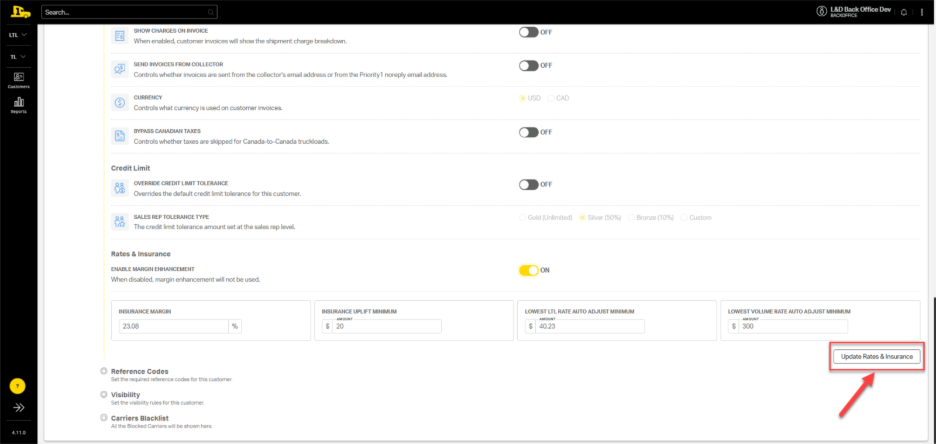
Rates and Insurance Preferences
Setting Insurance Margin and Minimum
Navigation: Customer > LTL > Preferences > Billing > Rates & Insurance
- Enter your desired Insurance Margin.
- Enter the Insurance Uplift Minimum.

When updating the insurance margin and/or minimum, click Update Rates and Insurance to save your changes.

Margin Enhancement
Navigation: Customer > LTL > Preferences > Billing > Rates & Insurance
Margin Enhancement is a tool that protects your profit when one carrier’s rate is significantly lower than others.
Found in the Rates and Insurance section of Customer LTL billing preferences, Enable Margin Enhancement will automatically be toggled ON. To deactivate this feature on a customer account, toggle Enable Margin Enhancement to OFF.
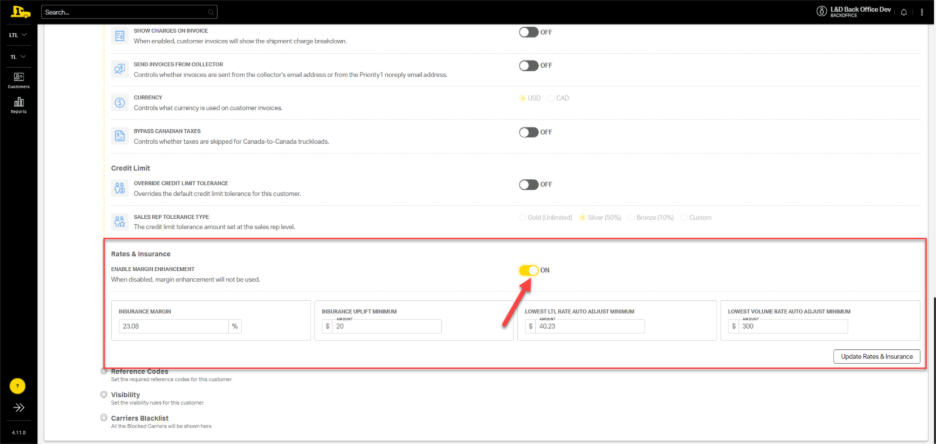
To adjust the impact of the margin enhancement feature, users can edit the rate amounts in the following fields:
- Lowest LTL Rate Auto Adjust Minimum
- Lowest Volume Rate Auto Adjust Minimum
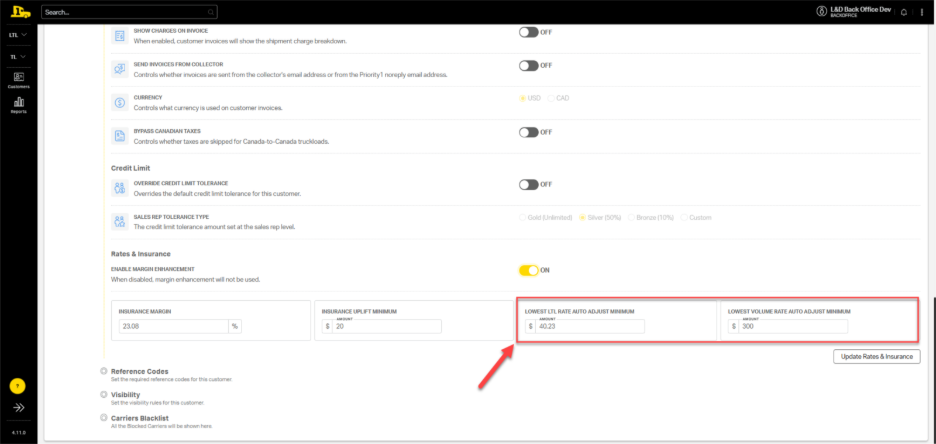
After making changes to any margin enhancement field, select Update Rates & Insurance to save changes.
ℹ️For more information about margin enhancement, click here.
Reference Code Preferences
Use Reference Codes to specify which billing codes a customer requires on shipments. This ensures consistency and supports the customer’s internal accounting process.
How to Set Reference Codes
Navigation: Customer > LTL > Preferences > Billing
Under Reference Codes, locate the required code types (e.g., PRO, PO, Sales Order, or customer-specific codes).
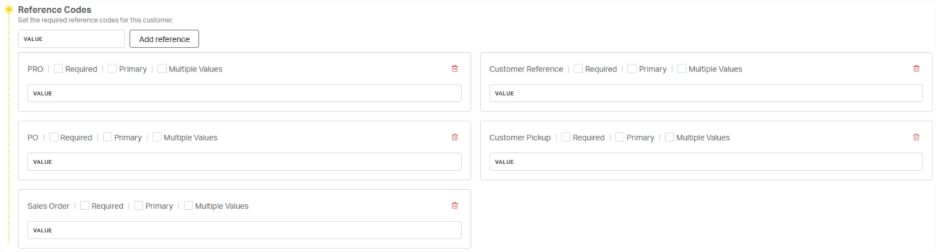
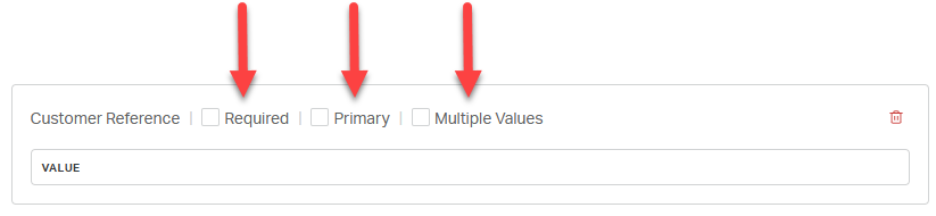
For each code, users can configure the following options:
- Required – Makes the field mandatory during booking.
- Primary – Marks the code as the main shipment identifier.
- Multiple Values – Adds extra fields if more than one code for this reference type is required per shipment.
- Value – Prefills the same value on all shipments.
💡Tip: Use Value when the customer requires a fixed reference (e.g., department code or internal project ID) on every shipment.
Saving Preferences
⚠️Remember, after making any changes to customer preferences, select Save Preferences before leaving the page.